Accuracy or Reproducibility?
In discussing measurement of dynamic parameters for process control, and specifically temperature, the phrase is often heard “just give me a number; it doesn’t have to be accurate, only reproducible”. Unfortunately, this sets up the manufacturer for one of the most difficult faults to find and correct, intermittent poor quality. Here’s how it happens:
Consider a process with two dynamic parameters, for example, a forging weld. For this example, the two parameters are pressure and temperature (a forging weld adds no material).
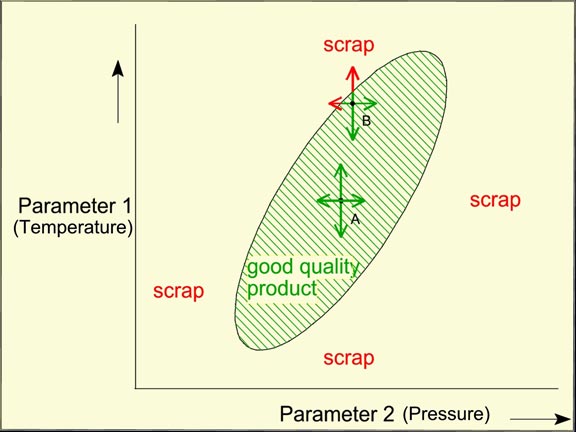
Our sketch shows the surface of good quality, the boundary that separates good product from scrap. The arrowed lines show the natural variation of the parameters. (Even controlled parameters have some natural variation: besides the inaccuracies of the measuring instruments, the variables may not be measured everywhere in the product, or at all times, or the measurer/controller doesn’t respond fast enough, etc.)

When the process is operating at Point A, all is well. However, at Point B there is intermittent scrap. If the testing of the scrap product is sophisticated enough, it may determine that some failures are due to Parameter 2, as well as Parameter 1. This is a red herring, for we can see from the surface that the problem is entirely caused by a shift in the value of Parameter 1. (The small shift in Parameter 2 actually helps.)
How did the process get from point A to point B with the operators unaware of it? The manufacturer is relying on reproducibility, defined as: “the closeness of agreement among repeated measurements under the same operating conditions over time”. Anything that changes the operating conditions destroys the reproducibility that the manufacturer is relying on.
At Point B and unaware of it, the manufacturer must now pay the inaccuracy penalty.
Reproducibility is not realistically attainable in manufacturing. Change destroys it, and change is a constant. Raw materials, BTU content of fuel gases, phase angle of the electrical supply, mechanical/storage history of workpieces, process equipment wear or adjustment, operator methodology, ambient temperature and humidity, and more all change. Manufacturers periodically scramble to find out what is causing the problem, expending time, effort, raw product, and money, only to find the problem just goes away. However, it will be back.
To ensure good quality, dynamic parameters should be measured as accurately as possible.
Just as there is an inaccuracy penalty, there is an accuracy reward. Accurately mapping the surface of good quality allows the manufacturer to achieve it in different ways. Improved yield and quality are only the start of the benefits available; this knowledge can result in new products and processes, and the huge returns they promise.
